An increasing quality awareness in many areas of daily life, and especially in the field of industrial goods, has been observed for some years. Manufacturers of wires and cables have also been investing intensively in measuring and control technology as well as inline control over the last years. At the same time, amongst others, the diameter and ovality of products play a crucial role. These cable parameters can be measured in the production line by different techniques, which shall be described in the following article.
 Until now, three different methods for measuring the diameter have been established on the market: laser scanning, the conventional shadow projection, and the diffraction-based method (laser shadow projection).
Laser scanner measuring devices work with a rotating mirror, or a rotating disk, striking a laser beam across the measuring field. Thus, two lenses are used to adjust the laser beam almost parallel across the measuring field and onto a light sensor. The product diameter is calculated by comparing the time during which the laser beam is shadowed by the product with the time the laser beam needs to pass the whole measuring field.
Conclusion: The measuring frequency depends on the rotation speed and the surface finish of the mirror. An averaging from several measurements is often necessary to achieve a high accuracy.
The digital measuring method with CCD line sensors requires no moving components. Therefore, accuracy, repeatability, and the measuring rates are higher. One can distinguish between the classical shadow projection and the diffraction-based method.
The conventional shadow projection, like the laser scanning method, uses two lenses, which are installed in front of and behind the product. These lenses adjust the laser beam onto a CCD line, on which the darkened diodes are counted in order to determine the diameter by means of the shadow image.
 Conclusion: Using optical lenses is very cost-intensive. As a result, assembly, alignment and calibration requirements have a negative impact on profits and amortization.
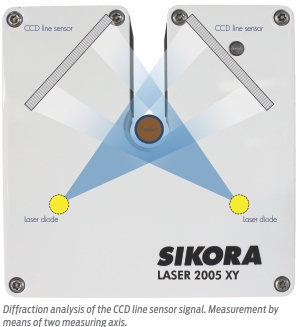
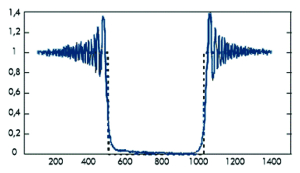
Regarding the diffraction-based method – the measuring principle of SIKORA’s LASER Series 2000 and 6000 – the high-resolution laser beam directly illuminates the CCD line. According to the theory of diffraction, the left and right geometrical-optics shadow edges are calculated from the diffraction fringe information. Thus, the product diameter can be determined by their distance from each other. Gauge heads with the CCD line sensor technology measure the diameter of transparent as well as opaque products in two or three planes. In addition, they work precisely independent of the materials used.
Conclusion: The diffraction-based method works with an extremely high measuring rate that is only limited by the frequency of the CCD line sensors. This allows several thousand measurements per axis per second for product diameters from 0.05 to 500 mm. Furthermore, the gauge heads of SIKORA’s LASER Series 6000 guarantee a reliable detection of lumps and neckdowns on the product surface. Upon request, the lumps and neckdowns can either be visualized directly on the display at the gauge head or displayed, documented and analyzed by SIKORA’s display and control devices.


